Managing RDKs from the SRP Editor
Like most developers, the programmers at SRP Computer Solutions, Inc. love making tools that simplify complex tasks and make us more productive. With so many tools, it was only a matter of time before we created a tool to help manage our tools, specifically, the deployment of our tools.
Repository Deployment Kits (RDKs) are the means by which we deploy our tools such as SRP Editor, SRP Utilities, etc. As such, we found ourselves expending a lot of time and effort on just the RDK management. Maintaining RDKs requires several steps and a separate tool. Since we spend so much time in the SRP Editor, it seemed natural to enhance the SRP Editor with time saving RDK tools. This thought process led to the “Add to RDK” menu and the RDK command.
Add to RDK
The “Add to RDK” tool is accessed via the Tools menu or by pressing F6.
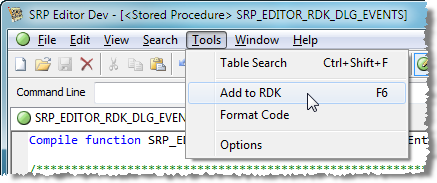
Doing so opens the “Add to Repository” dialog.

The purpose of this tool is to make it simple to add or remove a stored procedure to an existing Repository View. The process looks like this:
- . Open a Stored Procedure
- . Press F6 or choose the Tools -> Add to RDK menu
- . Use the check boxes to add/remove the active Stored Procedure to/from an RDK
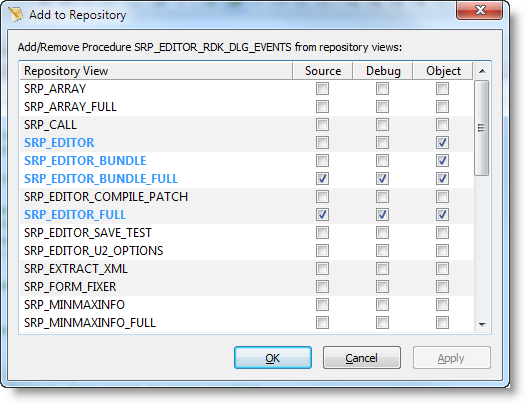
In the screenshot above, you’ll notice three check box columns. This allows you to specify which parts of the Stored Procedure are included in the RDK: Source, Debug, and Object. The screenshot shows a good example of this. Each of our tools has two RDK’s, one that includes all source code, in case we need to deploy the source code to another environment for testing, and one without source code, which we deploy to the end users. Anytime I add a new stored procedure to a toolset, such as our SRP Utilities, I can quickly add it to the appropriate RDKs in just a couple easy steps.
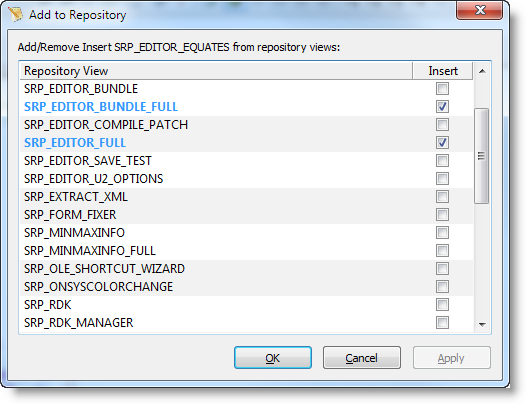
You can also use this tool for Inserts:
Notice there is only one column, since there is no concept of object/debug code for inserts. You can also use the “Add to RDK” tool for Records:
Like inserts, there is only check box column. A record is either added to the RDK or it is not. Note that any records will be added to the repository view as an APPROW entity. We have plans to make this smarter in the future, but for now, if you need to add a popup, message box, or form to the RDK, you need to use the RDK tool built into OpenInsight.
RDK Command
The RDK command simplifies the process of exporting RDKs. Those familiar with OpenInsight’s RDK tool have likely encountered the caveats involved in exporting an RDK to a folder. For example, the folder must already exist and be empty. The RDK command eliminates these quirks and provides a very powerful additional feature. First, let’s look at the command line syntax:
RDK [INSTALL|EXTRACT] SourceList [(options)]
The RDK command’s first parameter is optional (see the Installing RDKs section below) and it determines whether or not we are installing an RDK or creating one.
Installing RDKs
To install an RDK, the equivalent of running the “RUN RDKINSTALL” statement in OI, follow the RDK keyword with the INSTALL keyword or omit this parameter altogether. The SourceList portion of the statement is a list of paths containing the RDKs we wish to install. As the name suggests, you can install multiple RDKs in a single call. Both of the following command lines work:
RDK INSTALL "C:\RDK\SRP_Editor_Rdk" "C:\RDK\SRP_Utilities_Rdk"
RDK "C:\RDK\SRP_Editor_Rdk" "C:\RDK\SRP_Utilities_Rdk"
There are no options when installing RDKs. Simply provide the list of RDK paths. The quotes are only necessary if the paths contain spaces.
Extracting RDKs
To extract and RDK, you must include the EXTRACT keyword and a list of one or more RDK deployment definitions. Recall, the RDK’s destination directory is defined in the deployment definition and is therefore not supplied in the RDK command. As an example, here is the command to deploy the SRP Editor:
RDK EXTRACT SRP_EDITOR
Now, as is, this command will operate exactly as the OI RDK tool, failing if the directory does not exist or is not empty. This is where the options come in. There are three options: C, S, and V. The “C” option clears the destination directory before extracting the RDK. The “S” option creates the directory if it does not already exist. So, to ensure a successful extraction every time, use this command:
RDK EXTRACT SRP_EDITOR (CS)
The “V” option is useful for creating RDKs that target multiple versions of OpenInsight. To illustrate, the SRP Editor is developed in OpenInsight 7.0, then extract using the “V” option to create 7.1, 7.2, and 8.0+ compatible versions of the RDK. What do we mean when we say compatible? First, any presentation server changes between version are taken into account. Thus, any forms created in 7.0 are form fixed in the 7.1 and later RDKs. Secondly, each RDK version is given the appropriate RDKMODULEINSTALL for that version.
NOTE: There are no currently no RDK versions created for 9.x because the 8.0 RDK works in those versions of OI as is.
A final point of interest is that the “V” option only creates RDKs starting with the version of OI from which the command is executed. That is, if you run the RDK EXTRACT command in OI 7.2, then the “V” option will only create the 7.2 and 8.0 RDKs. So, our final command can look like this:
RDK EXTRACT SRP_EDITOR (CSV)
And since a list of deployment definitions are supported, we can extract several of our tools in one call:
RDK EXTRACT SRP_EDITOR SRP_MAIL SRP_UTILITIES (CSV)
It’s our hope you find either of these tools useful in your own environment.
Leave a Reply