PowerShell as an OpenInsight TCL Enhancement

The TCL (The Command Line) window is an invaluable part of OpenInsight, but at times it can feel restrictive or wanting for more features. This blog article demonstrates how Windows PowerShell can be a flexible enhancement for the command line window with a minimal learning curve while making the task of querying OpenInsight data a lot easier.
TCL Is Great – Why Work Outside OI?
Having worked with a variety of database environments over the years I find myself wanting more when I return to the OpenInsight TCL.

This is especially true when I’m troubleshooting an unfamiliar system with unfamiliar data. Here are a few of the issues I keep facing when using TCL:
- The data table is huge and I need to run multiple selects before the LIST statement. Writing each select statement individually and then having to re-run them because of a typo or wrong query is cumbersome. Even writing the queries in notepad then copying and pasting into TCL is a cognitive drain.
- The column spacing in my LIST statement is wrong but I forgot to do a SAVELIST after the queries so I have to start again by copying and pasting each query OR choosing the queries from the dropdown history (assuming it’s there if I didn’t lose my session).
- Results aren’t what I expected – digging through the last few select statements and scrolling left to right is making me cross-eyed.
- The results are in the print preview window but I just need to copy a few lines – I wish I could just copy without having to export and re-open in another format.
- The results should be sorted differently than what I first requested.
- I should have just written a test program to query and display the data I needed.
While my use cases as a system administrator may be different than the typical OpenInsight developer, PowerShell is the answer to all these issues (and more).
Running Your First PowerShell Script
If you are already familiar with PowerShell scripts and how to run them you can skip this section. The PowerShell runtime environment is already included in Windows and is meant to be a replacement to the DOS command line and BAT files. There are two primary ways to run PowerShell scripts.
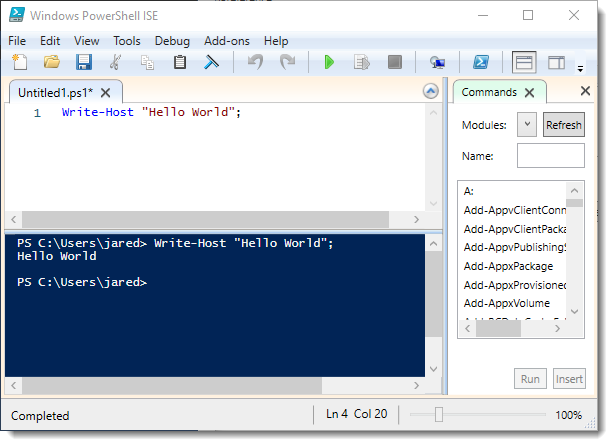
From the Windows PowerShell ISE Program
Look in your start menu or search for a program named Windows PowerShell ISE. This program is very useful for editing and running PowerShell scripts and commands. The program allows you to type a script in the editor or run commands and see the results in the command line. The image below shows an example.
Executing a PS1 File
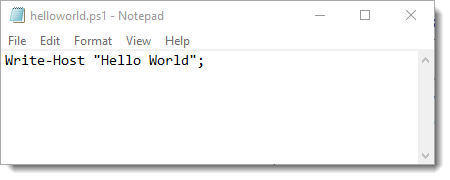
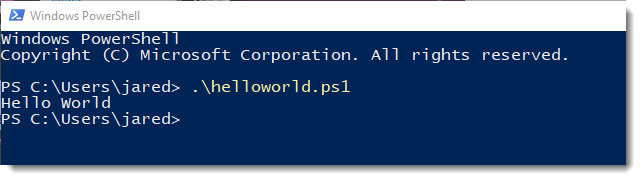
If you don’t have the Windows PowerShell ISE program available, your computer should have the PowerShell command line available for use. Here is an example of creating and running a PowerShell script.
-
- Create a new PS1 file in notepad and save it. For example, helloworld.ps1.
- Open the run dialog and execute powershell.exe.
- In the PowerShell command line execute to see the results:
- Create a new PS1 file in notepad and save it. For example, helloworld.ps1.
.\helloworld.ps1
Any text editor can create a PS1 file for use by the PowerShell command line but PowerShell specific editors like the Windows PowerShell ISE give additional features such as syntax highlighting, syntax hints, and debugging features.
OpenInsight Prerequisites
Before you an access OpenInsight from PowerShell you must have the OEngineServer (OESocketserver.jar) running and NetOI installed.
OEngineServer
The OEngineServer must be running as either a Windows service or in debug mode from the command line. While setting up and using the OEngineServer is beyond the scope of this article you can run it locally on your workstation by following these steps:
- Open a command prompt and change to the OpenInsight directory.
- Execute:
java.exe -jar OESocketserver.jar
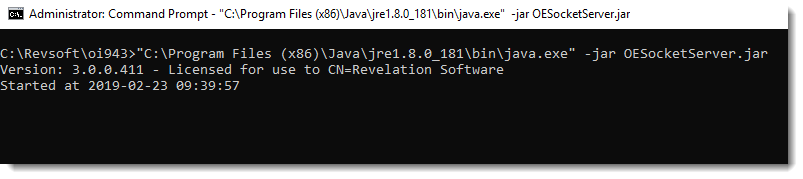 Tip: If you don’t have the 32-bit version of Java.exe in your system PATH environment variable the above command won’t work and you should specify the complete path to the 32-bit java.exe as shown in the image below. The path will vary depending on which version of Java you have installed but you must use the 32-bit version for OI 9.x
NetOI
NetOI is a .NET assembly DLL for allowing .NET environments (in our case PowerShell) to access the OpenInsight database. It is included as part of the OpenInsight clientsetup.exe in a file named RevelationDotNet4.dll which is usually installed into your Program Files (x86) directory. Assuming your workstation already has clientsetup.exe installed you only need to know the location to the RevelationDotNet4.dll.
Note: NetOI was introduced early in the OI 9.x release as a separate MSI installation package. In later versions of OpenInsight 9.3+ the assembly was included as part of the RevelationDotNet4.dll and no longer requires a separate installation. If you see old documentation that refers to a separate NetOI MSI installation you can ignore it because it’s now included in RevelationDotNet4.dll.
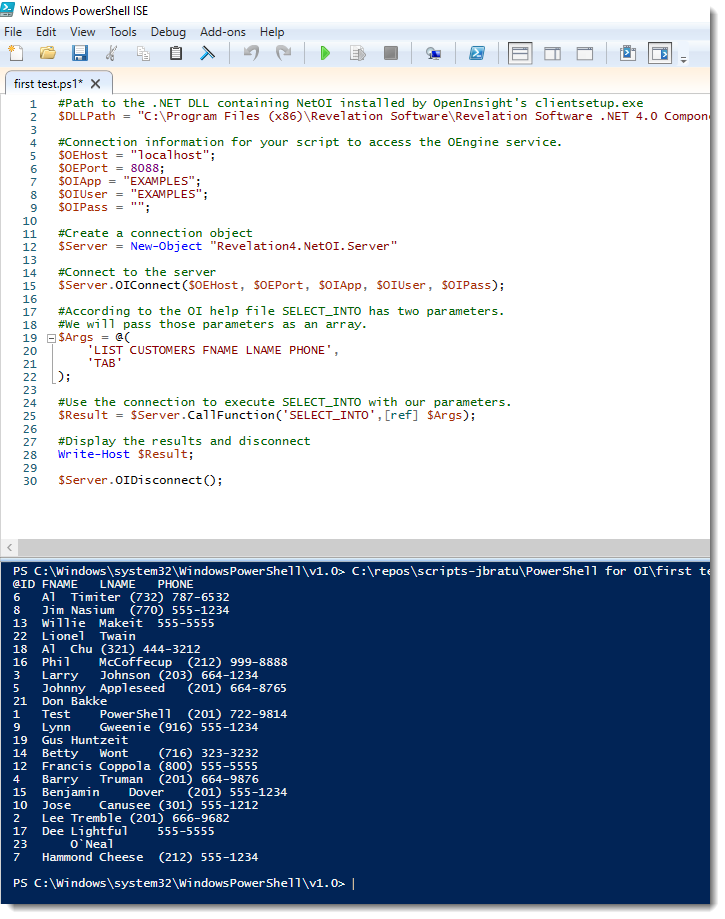
Your First OpenInsight Query From PowerShell
Copy the script below into your PowerShell script file or ISE editor.
#Path to the .NET DLL containing NetOI installed by OpenInsight's clientsetup.exe
$DLLPath = "C:\Program Files (x86)\Revelation Software\Revelation Software .NET 4.0 Components v9.4.0\RevelationDotNet4.dll";
$OITypes = Add-Type -Path $DLLPath
#Connection information for your script to access the OEngine service.
$OEHost = "localhost";
$OEPort = 8088;
$OIApp = "EXAMPLES";
$OIUser = "EXAMPLES";
$OIPass = "";

#Create a connection object
$Server = New-Object "Revelation4.NetOI.Server"

#Connect to the server
$Server.OIConnect($OEHost, $OEPort, $OIApp, $OIUser, $OIPass);

#According to the OI help file SELECT_INTO has two parameters.
#We will pass those parameters as an array.
$Args = @(
'LIST CUSTOMERS FNAME LNAME PHONE',
'TAB'
);

#Use the connection to execute SELECT_INTO with our parameters.
$Result = $Server.CallFunction('SELECT_INTO',[ref] $Args);

#Display the results and disconnect
Write-Host $Result;

$Server.OIDisconnect();
Adjust the $DLLPath variable so it points to your RevelationDotNet4.dll if needed.
Also adjust the variables $OEPort, $OIApp, $OIUser, and $OIPass if they are different for your application. These are needed so your script can connect to the OEngineServer (aka OESocketServer since this is the name of the .jar file).
The script will connect to the OI EXAMPLES database using the OEngineServer and list out some information from the CUSTOMERS table.
If successful you should see the results appear in the command window as shown in the image below.
Congratulations, you reported OpenInsight data from PowerShell. While the results may look underwhelming let’s take it one step further.
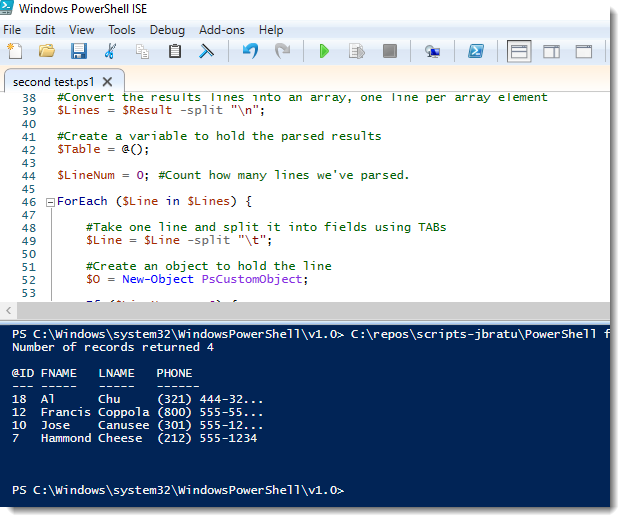
Querying Formatted Data from OpenInsight
Let’s build upon the previous script and add some code to format the results and display it as a PowerShell table.
#Path to the .NET DLL containing NetOI installed by OpenInsight's clientsetup.exe
$DLLPath = "C:\Program Files (x86)\Revelation Software\Revelation Software .NET 4.0 Components v9.4.0\RevelationDotNet4.dll";
$OITypes = Add-Type -Path $DLLPath

#Connection information for your script to access the OEngine service.
$OEHost = "localhost";
$OEPort = 8088;
$OIApp = "EXAMPLES";
$OIUser = "EXAMPLES";
$OIPass = "";

#Create a connection object
$Server = New-Object "Revelation4.NetOI.Server"

#Connect to the server
$Server.OIConnect($OEHost, $OEPort, $OIApp, $OIUser, $OIPass);

#The SELECT_INTO function accepts a semicolon separated
#list of SELECT statements prior to a final list statements
#According to the OI reference manual.
$Q = @(
'SELECT CUSTOMERS WITH PHONE NE ""',
'SELECT CUSTOMERS WITH LNAME STARTING WITH "C"',
'LIST CUSTOMERS FNAME LNAME PHONE'
);

#Use powershell to join the criteria into a single string
$Qs = $Q -join ';';

#The parameters for the SELECT_INTO function.
$Args = @(
    $Qs,
    'TAB'
);

#Run the SELECT_INTO function and hold the result in $Result
$Result = $Server.CallFunction('SELECT_INTO',[ref] $Args);

#Convert the results lines into an array, one line per array element
$Lines = $Result -split "\n";

#Create a variable to hold the parsed results
$Table = @();

$LineNum = 0; #Count how many lines we've parsed.

ForEach ($Line in $Lines) {

    #Take one line and split it into fields using TABs
    $Line = $Line -split "\t";

    #Because we're taking TAB delimited data some of the lines might
    #Have white spare or new line characters, trim them off.
    $Line = $Line | foreach{ $_.Trim()};

    #Create an object to hold the line
    $O = New-Object PsCustomObject;

    If ($LineNum -eq 0) {
        #The first line of the output contains the field names
        $Fields = $Line;

    } else {
        #All other lines besides the first are data lines

        #Loop through each field and add a name value pair to the
        #Object which will represent the output.
        for($i = 0; $i -lt $Line.Count;$i++) {
           $O | Add-Member NoteProperty $Fields[$i] $Line[$i];
        }

        #Add the line object to the result table
        $Table += $o;

    }

    $LineNum += 1;
}

#Done
$Server.OIDisconnect();

Write-Host "Number of records returned $($Table.Count)";

#Show the table
$Table;
Now when you run the script you’ll see a filtered list of results in a formatted table.
Looking good, right? But I can hear you thinking “This is cool, but it’s just like writing a program to query the data”. Yes, you are right, but here is the big finish and the really cool bit.
Using PowerShell For What It’s Great At
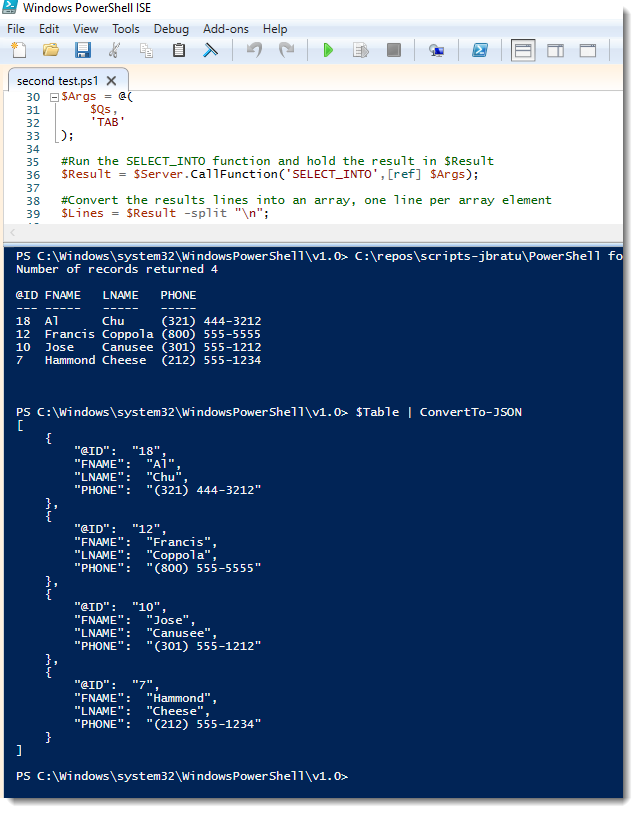
If you haven’t noticed by now, the PowerShell ISE window allows the text editor and command line to share the same environment. All of our result data and variables are still available for use in the command line even though the script has finished. Remember, all of our selected data was stored in $Table – let’s see what we can do with it.
All of these examples take the $Table object and pipe it into another command that specializes in a specific task.
Give Me JSON
Easy, just run the ConvertTo-JSON command:
$Table | ConvertTo-JSON
Give Me CSV
No problem, just ask PowerShell to export the $Table with Export-CSV:
$Table | Export-CSV "c:\temp\report.csv"
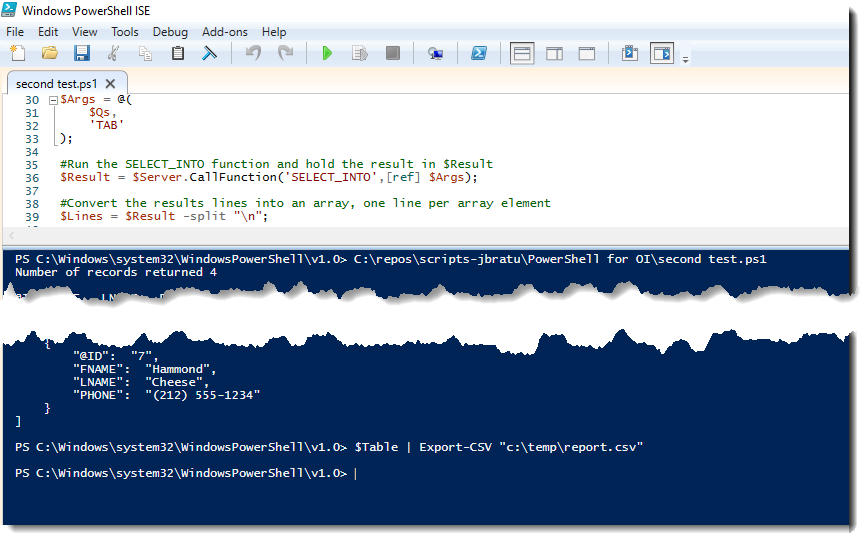
Bonus: Want to see the results in Excel? No problem, ask PowerShell to open the file:
Invoke-Item “C:\TEMP\report.csv”
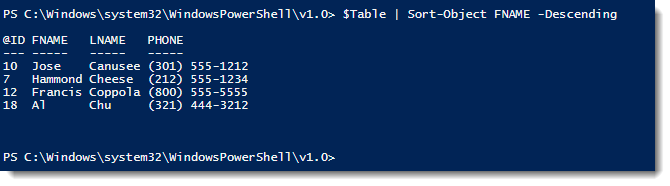
Sort the Results
Normally, you need to sort LIST statements based on the first SELECT or LIST statement but now that the data is stored in memory we can easily change it using the Sort-Object command.
$Table | Sort-Object FNAME -Descending
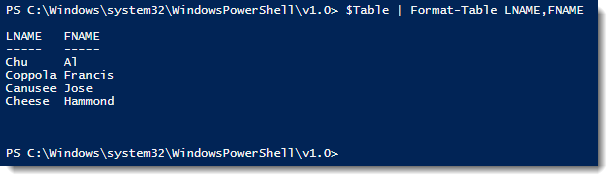
Hide Displayed Columns
This time we’ll use the Format-Table command and specify which columns to show.
$Table | Format-Table LNAME,FNAME
Wrapping Up
Any of the post-script commands that you ran could easily be included in the script and run every time the script is run but the purpose is to show you how versatile PowerShell can be for working with results. We’ve only scratched the surface because there is a whole ecosystem with PowerShell for getting things done.
The NetOI tool has features that we didn’t even get a chance to talk about such as read and write records. If you are curious, see the 59-931 NetOI Quick Start Guide 2.0.pdf file in the OpenInsight documents directory or the NetOI.chm file in the OpenInsight directory.
I hope you appreciate how open the OpenInsight ecosystem truly is and have some new ideas about how you can leverage new tools to be more efficient.
Leave a Reply