Adding the SRP Editor to the OpenInsight Side Tool Bar
 Over the years we have been asked if there is a way to launch the SRP Editor from the OpenInsight side tool bar. This request became so commonplace that we created a boiler plate email that we would send out to new customers automatically. Eventually we added this to our wiki site as a product related article. However, with the advent of our blog and newsletter we have come to realize that less is more when it comes to avenues for publishing helpful information. Therefore, we have shutdown the product articles and will be moving these into blog entries in order to give them a new home.
Once upon a time – pre-OpenInsight 8.0 – the only way to launch a third-party utility using the side tool bar was to hijack an original OpenInsight form belonging to an existing button (e.g., Editor, XML Workspace, C/S Workspace). This typically required that the form be renamed (if still needed) and a replacement version created whose sole purpose was to launch another form (e.g., SRP Editor). Needless to say, this wasn’t a popular solution unless the tool being replaced was really unnecessary. Fortunately, with OpenInsight 8.0, the ability to customize the side tool bar was introduced.
General Instructions
The OpenInsight help document (OINSIGHT.CHM) has an article labelled Customizing the Side Tool Bar. This provides you with good general instructions for adding, removing, and rearranging the side tool bar to your liking. There is no point in republishing those notes here so we recommend that you do you own reading. However, the following instructions are enough to add a button that launches the SRP Editor.
Updating OINSIGHT.INI
OpenInsight relies on the settings in the OINSIGHT.INI file to determine how the side tool bar is configured. Normally this file is found in the C:\WINDOWS folder. However, with newer versions of Windows (Vista and later), some configurations will store these files in a special Virtual Store folder that is contained in the following path:
C:\Users\<username>\AppData\Local\VirtualStore\Windows
Once you have this file open (just use Notepad or your favorite text editor…or even the SRP Editor!) you will want to add the following lines somewhere within the section labelled [Application Manager]:
SideBarCustom_Name=SRP Editor,SRP Table Search
SideBarCustom_Text=Launch the SRP Editor,Launch the SRP Table Search Utility
SideBarCustom_Img=C:\SRPEditorIcon2.bmp,C:\SRPTableSearchIcon.bmp
SideBarCustom_Cmd=OIWINEXE**SRP_EDITOR,OIWINEXE**SRP_TABLE_SEARCH
A couple items that need to be pointed out:
- This configuration actually adds two buttons to your side tool bar. One for the SRP Editor and one for the SRP Search Utility. Customize as you see fit.
- This configuration assumes you have two bitmap images located in the root of your C: drive. You will need to modify to your preference.
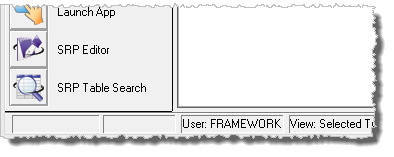
If OpenInsight is running when the OINSIGHT.INI file is updated then it will need to be restarted. Here’s an example of what will appear:
Button, Button, Who’s Got The Button?
Naturally we wouldn’t show you some nice looking button icons without making them available to you. So if you like what you see then you are welcome to download the entire package:
Please note that while Revelation has denied support for transparency with side tool bar buttons, we have discovered that there is support. However, OpenInsight uses a primitive Microsoft method which requires a specific color of gray to be the background. Therefore, the packaged images are colored correctly to allow for transparency. (Note: it might require 32-bit color settings to work. Lower color settings seem to disable the support for transparency.)
(Reminder: As per the comments in this OpenInsight 10 blog entry, OINSIGHT.INI will become deprecated. We do not yet know how support for custom side bar buttons will be implemented.)
Pingback: The blog postings just keep coming | Martyn's RevSoft UK Blog
Unfortunately there is a max. limit of 5 custom items only.
A quick way to get to this folder is to use the environment variable in the path. In the address bar, write “%localappdata%\VirtualStore\Windows”