Much ADO About Nothing
Over the past couple of years, SRP has been quite busy working with other development teams on projects requiring integration between OpenInsight and SQL database servers. In most cases, these systems already had interfaces designed around ODBC. While functional, we proposed converting these ODBC processes to ActiveX Data Objects (ADO) to improve performance, reliability, and ease of maintenance. While ADO is certainly not new and has been promoted within the Revelation community for many years, we’ve met a number of developers who are still unfamiliar with it. We concluded this is mainly due to two reasons: 1.) adherence to the adage, “if it ain’t broke then don’t fix it”, and 2.) general confusion about how to make it work. This article hopes to clear up any uncertainty regarding ADO and perhaps encourage others to give it another look.
One common nuisance with ODBC is the need to install the right software driver for the target database server (e.g., Microsoft SQL Server, MySQL, Oracle). This has to be performed on every client that needs to make a connection. Additionally, a Data Source Name (DSN) entry must be added to each client so that it has the essential information regarding the target database server (e.g., IP, port, credentials, database name). This introduces a maintenance chore, especially when new clients are introduced to the environment or when new databases are added to the server.
The good news is that ADO simplifies much of this. Like ODBC, ADO requires both a software driver (referred to as an OLE DB provider) and connection information for the target database. However, ADO eliminates the need for this connection information to be defined in the client the way ODBC relies upon DSN entries. Instead, the developer provides this information through connection strings (more on these later) via code. Thus, besides performance and reliability improvements, ADO tends to be far more convenient to maintain. Fortunately, it is relatively easy to convert existing ODBC code to ADO.
Syntax Comparison
Here is a basic outline of how a sample SQL query is made through an ODBC connection:
// Create a connection object. This assumes that the appropriate ODBC driver and DSN entry
// have already been installed on each client.
objConnection   = XOInstance(Source, Provider, LoginID, Password, '', OptionFlags)
If objConnection NE '' then
    // Create a query object for the created connection object.
    objQuery    = QryInstance(objConnection)
    if objQuery NE '' then
        // Use the Execute method to call a script within the query object.
        QueryStatement  = "select * from customers where status = 'Active'"
        Accepted        = QryMethod(objQuery, QRY_EXECUTE$, QueryStatement)
        If Accepted EQ True$ then
            Loop
                // Read one database row at a time using the GetRow method.
                Accepted    = QryMethod(objQuery, QRY_GETROW$, DataRow)
                RowLen      = Len(DataRow)
            While (Accepted EQ True$) AND (RowLen GT 0)
                // Data row processing here.
            Repeat
        end else
            // Error processing here.
            QryMethod(objQuery, QRY_GETERROR$, '','','','', Error)
        end
        // Destroy the query object.
        Destroyed   = QryMethod(objQuery, QRY_DESTROY$)
    end
    // Destroy the connection object.
    Destroyed    = XOMethod(objConnection, XO_DESTROY$)
end
Note, using ODBC within OpenInsight requires the use of a few system stored procedures (XOInstance, XOMethod, QryInstance, QryMethod). ADO, however, simply requires procedures capable of a COM interface (e.g., OLECreateInstance, OLECallMethod, OLEGetProperty). The following code comparison will use SRP_Com for the ADO calls:
// Create a connection object. This object is not dependent upon the OLE DB provider or
// other pre-installed components. It simply creates an object that can be used to implement
// property and method calls.
If SRP_Com(objConnection, 'CREATE', 'ADODB.Connection') then
    // Use the Open method to make an active connection to a target database server. The
    // content within the ConnectionString variable essentially replaces the DSN.
    SRP_Com(objConnection, 'CALL', 'Open', ConnectionString)
    If SRP_Com('', 'ERROR') then
        Error           = SRP_Com('', 'ERROR')
    end else
        // Use the Execute method to call a script within the connection object.
        QueryStatement  = 'select * from customers where status = "Active"'
        objRecordSet    = SRP_Com(objConnection, 'CALL', 'Execute', QueryStatement)
        If SRP_Com('', 'ERROR') then
            Error           = SRP_Com('', 'ERROR')
        end else
            // Use the GetString method to return the entire dataset (i.e., all database rows
            // from the query) in one pass. Each row is @RM delimited and each column data is
            // @FM delimited.
            DataRows        = SRP_Com(objRecordSet, 'CALL', 'GetString', 2, -1, @FM, @RM)
            If DataRows[-1, 1] EQ @RM then DataRows[-1, 1] = ''
        end
        // Release the record set object.
        SRP_Com(objRecordSet, 'RELEASE')
    end
    // Release the connection object.
    SRP_Com(objConnection, 'RELEASE')
end
A quick study of the two blocks of code reveals that they share very similar patterns. There is almost a one-to-one equivalent call in ADO to replace those used in ODBC. Here are some general comments on the ADO code block:
Connection Strings
All the connection magic is handled by a well-formed connection string and implemented through the Open method. Perhaps the most challenging part is learning how to form this string. Fortunately, there are a few ways this task is made quite easy. The first method is to create a .UDL (Universal Data Link) file and let Windows build the string for you. Simply follow these steps:
- Create an empty text file anywhere you like, such as on your Desktop. The name of the file does not matter.
- Rename the .txt extension to .udl. Once this is complete, the icon will change and Windows will now recognize this as a Microsoft Data Link file.
- Double-click (or right-click and select Open) on this file. It should now display the Data Link Properties dialog and automatically open to the Connection tab:
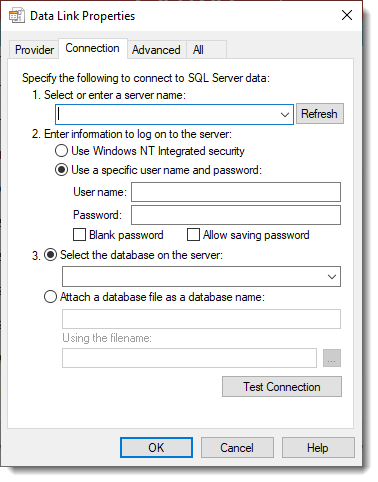
- Click on the Provider tab and confirm that your OLE DB Provider is selected. If you are not sure which OLE DB Provider you need or if the one you need is missing then consult with your IT team.
- Once the OLE DB Provider is selected, click back on the Connection tab. Now enter in all the essential connection information. Unlike ODBC, ADO has no option to display a dialog, so it is important that all necessary credentials are included.
- When all the information is entered, click the Test Connection button to confirm success:

(If you receive a “Test connection failed” message then double-check your connection information and try again.) - Click OK to save the UDL file.
- Right-click on the file icon and select an edit (rather than open) option and pick Notepad or any text file editor you prefer.
- The well-formed connection string will appear in line 3.
As you can see, connection strings are merely key/value attributes delimited by semi-colons. Here is an example of what one might look like:
[oledb]
; Everything after this line is an OLE DB initstring
Provider=SQLOLEDB.1;Password=mysecretpassword;Persist Security Info=True;User ID=myusername;Initial Catalog=MYDATABASENAME;Data Source=MYSERVERNAME
In the above connection string, the OLE DB Provider is for Microsoft SQL Server and a specific user name and password is passed in. Here is another example:
[oledb]
; Everything after this line is an OLE DB initstring
Provider=SQLOLEDB.1;Integrated Security=SSPI;Persist Security Info=False;Initial Catalog=MYDATABASENAME;Data Source=MYSERVERNAME
The second example swaps out the User ID and Password attributes for the Integrated Security attribute. The value SSPI means this connection needs to be authenticated using Windows NT integrated security (essentially, SSO).
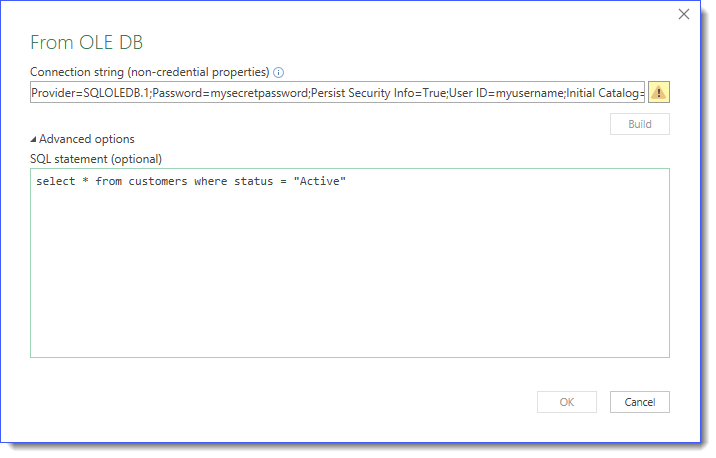
While UDL files are easy to create and test with, they do not provide any other interaction with the database. Sometimes we also need a way to quickly test a query or retrieve some sample data. For this, Excel is quite handy:
- Open Excel.
- Click on the Data tab in the Ribbon control.
- Click on Get Data > From Other Sources > and then From OLEDB.
- In the From OLE DB dialog, click on the Build button.
- This will open a Data Link Properties dialog, just as if you opened a UDL file. Select and enter the same information as normal. However, when you click OK, the resulting connection string will automatically be entered into the From OLE DB dialog. Clicking on the Advanced options link opens up a SQL statement editbox allowing you to perform ad-hoc queries:
While searching the internet is always a great way to get help, especially with ADO and connection strings, the Connection Strings website is dedicated to this subject (HT: Bob Carten). However, because this site contains so much information, I recommend starting out with one of the first two methods to avoid getting lost in the many examples that are provided.
RecordSet Object
Discerning readers will have noticed that ADO does not have a query object. Instead, ADO creates a record set object. The main difference is that query objects are created first and then a SQL script is passed in through the query object’s Execute method whereas record set objects are created as a result of the SQL script being passed in through the connection object’s Execute method. Despite the minor syntax and relationship differences, they are conceptually interchangeable.
Getting Data Rows
You may have noticed that the ADO code uses the GetString method to return all datarows in one call and stores it in an @RM delimited array. This is in contrast to the GetRow method used by the query object which must also be performed repetitively until the dataset is exhausted (much like the Basic+ ReadNext statement).
ADO does have its own GetRows method as well as other techniques for retrieving data. However, these methods are slower and require more programming beyond the scope of this article to demonstrate. The GetString method is quite convenient and fast because it parses the data set and inserts our preferred delimiters in the target server. There are some restrictions such as not being able to pull binary (BLOB) data. In most cases, GetString should work just fine.
That’s a Wrap
Much of what’s been written above has been posted on the Revelation forums over the years but hopefully condensing the critical information in this overview will be useful. If you have any questions we invite you to post them below. Better yet, navigate to our official discussion forum and start a conversation.
Leave a Reply